A 90-second story about a lighthouse keeper’s final night can feel ordinary or cinematic. The difference comes from deliberate choices in frame rate, lighting, composition, color, and pacing. Shooting at 24 frames per second and grading the dark sea blue can establish a film-like mood. Neither technique requires an expensive cinema camera or professional editing studio.
For anyone learning how to make a video cinematic, consistency matters most. A manual camera and DaVinci Resolve provide detailed control over each creative choice. MagicLight AI offers another route, turning a written premise into planned cinematic shots before generating the final frames.
Part 1. What Makes a Video Cinematic?
For the lighthouse short, a plan for how to make cinematic video covers camera settings first and story beats second. Shot at 60 fps, the keeper’s climb up the stairwell appears smoother than footage recorded at 24 fps.
Visual Elements of a Cinematic Look
Before the first take of the keeper at his lamp, the camera operator checks the following 5 settings, each with a number or a rule:
- 24 fps and a 180-Degree Shutter: A 180° shutter angle is commonly used in filmmaking, producing a shutter speed of about 1/48 second when recording at 24 fps.
- A Wide Aspect Ratio: A 2.39:1 frame, the scope ratio of many feature films, holds the tower and a long stretch of coastline in one shot.
- Shallow Depth of Field: An aperture near f/2 softens the stairwell behind the keeper’s face and pulls attention to his eyes.
- Motivated Light: Lighting on set can imitate believable sources, such as the oil lamp on the desk or the beam sweeping past the window.
- A Deliberate Color Grade: The night sea sits in cool blue and the lamp room in warm amber, two temperatures that mark each location at a glance.
Storytelling Elements Behind a Cinematic Feel
A cinematic look needs more than good lighting, the story must give each shot a reason to exist. These 4 elements explain how to make a cinematic video feel purposeful, from the opening frame to the final moment:
- An Establishing Shot: A wide view of the lighthouse at dusk tells viewers where they are before any close-up appears.
- Shot Progression: Each cut moves one frame size closer as the keeper climbs the stairs, which builds tension without dialogue.
- Sound Design: Wind against the glass and the hum of the lamp carry the mood through stretches with no narration.
- Pacing With Room to Breathe: Holding the final shot of the dark lamp for four seconds gives the ending its weight.
Part 2. How to Create Cinematic Videos with Magiclight AI
For how to create a cinematic video without a crew, MagicLight AI starts from one basic idea, like the lighthouse keeper’s last night. The Agent breaks that into a script and a scene-by-scene shot list. Once the shots are approved, Story to Video renders them as narrated scenes.
- Realistic Lighting Style: MagicLight AI’s Realistic style page says the look “prioritizes accurate shadows, reflections, and ambient occlusion over exaggerated effects.”
- Shot Directions per Frame: Storyboard frames each carry their own prompt, capped at 1,000 characters. AI Expand creates a short note like “slow push-in, low angle” into a full description.
- Mood-Sorted Music: Background Music filters include Cinematic Story and Emotional Drama, with a Volume slider that keeps the score under the narration.
- Long-Form Projects: Paid plans carry a film to 50 minutes in the Long Video Generator, room for a short film in several acts.
Guide: How to Create a Cinematic Video with Magiclight AI
The right settings bring the cinematic look together, but the order matters too. Follow the steps below to see how to make a cinematic video from the initial story idea to the final video export:
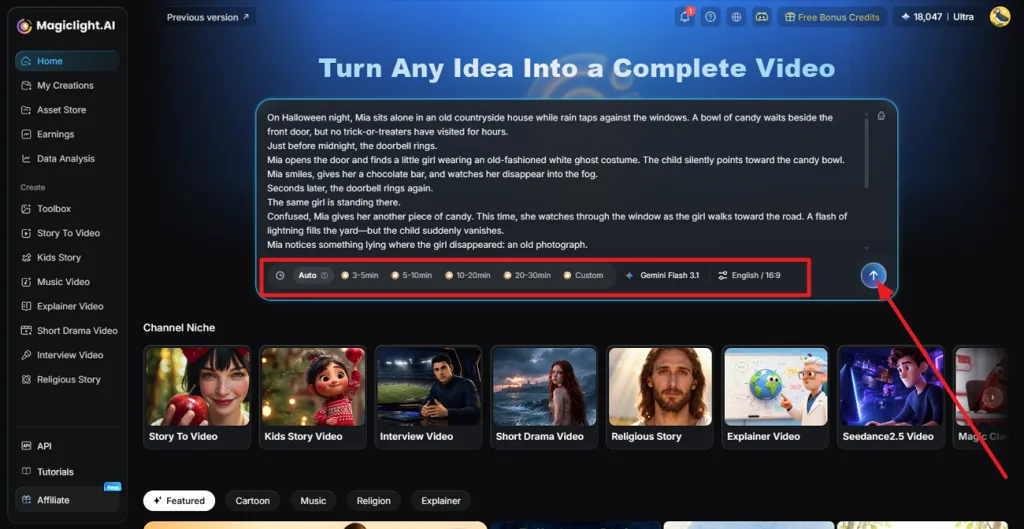
Step 1. Add Your Cinematic Story
Open MagicLight AI and enter your cinematic premise or prompt in the main input box. Leave the runtime set to Auto, then click the Arrow to start developing the idea into a story.
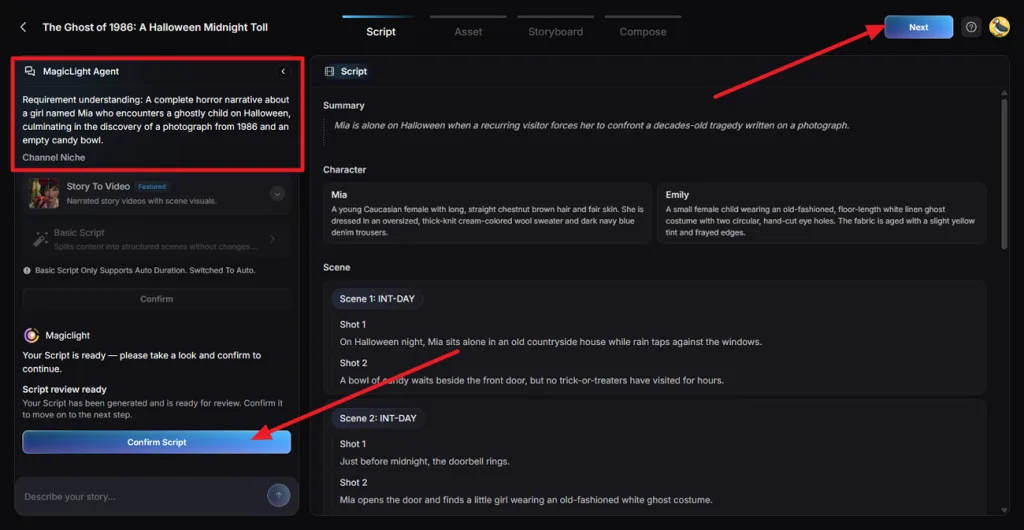
Step 2. Review and Confirm the Script
Check the generated Summary, character descriptions, scenes, and individual shots. Review the story structure and make any necessary changes, then select Confirm Script to continue.
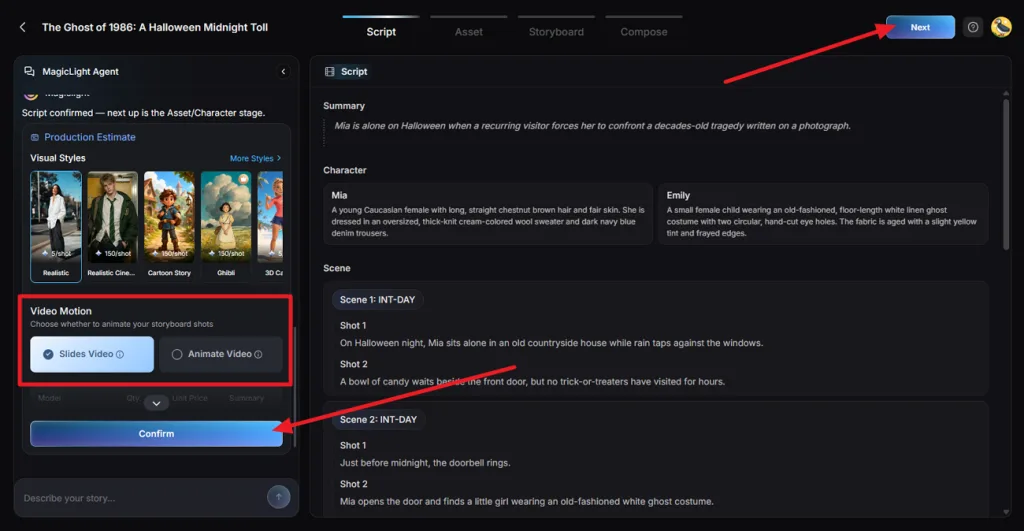
Step 3. Choose the Visual Style and Motion
Select Realistic under Visual Styles and choose Animate Video under Video Motion. Review the production estimate, then click Confirm to continue.
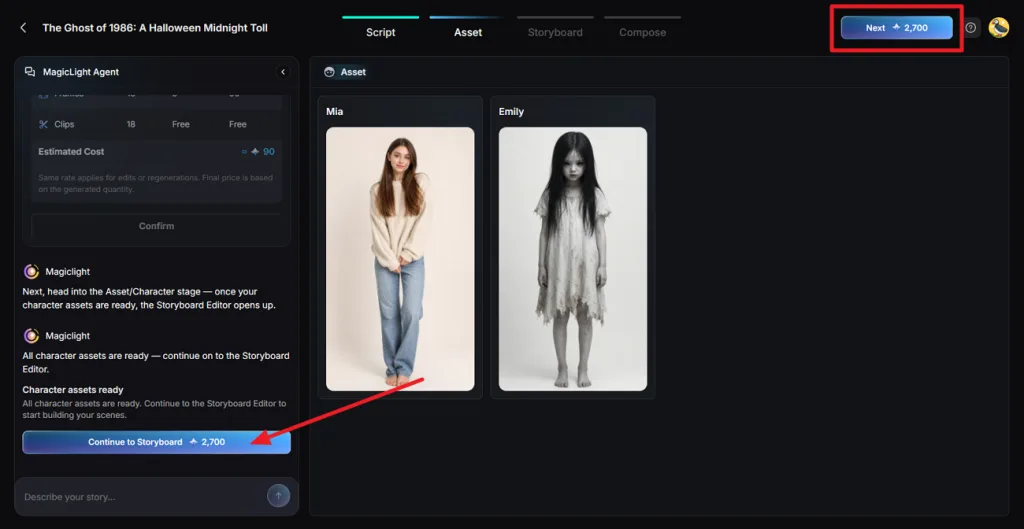
Step 4. Review the Character Assets
MagicLight AI creates visual assets for the main characters based on the approved script. Check their appearance and consistency across the story, then select Go to Storyboard to proceed.
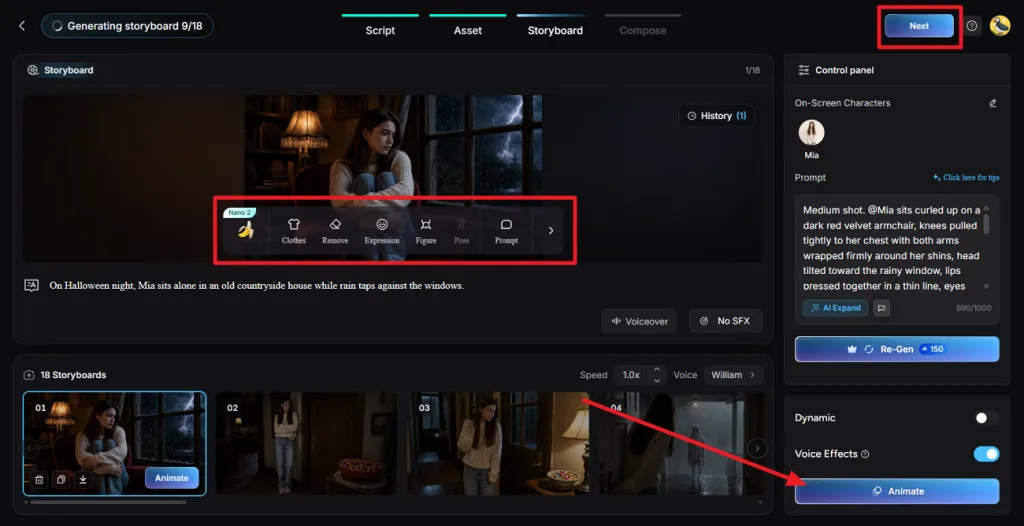
Step 5. Refine and Animate the Storyboard
Review each storyboard shot and use Prompt to adjust framing and camera angles. Select Re-Gen to redraw individual shots when needed. Adjust the Voice and Speed settings, enable Voiceover when needed, then animate the scenes and press Next to continue.
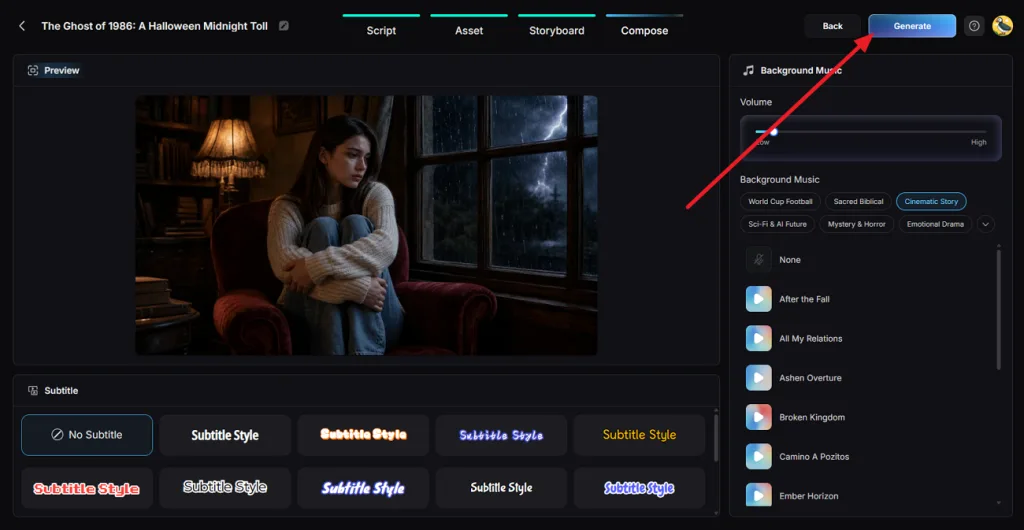
Step 6. Add Music and Subtitles
Move to Compose and preview the assembled story. Pick suitable Background Music, adjust its volume, and choose a readable Subtitle Style for the scenes. When everything looks right, press Generate.
Step 7. Set the Export Quality
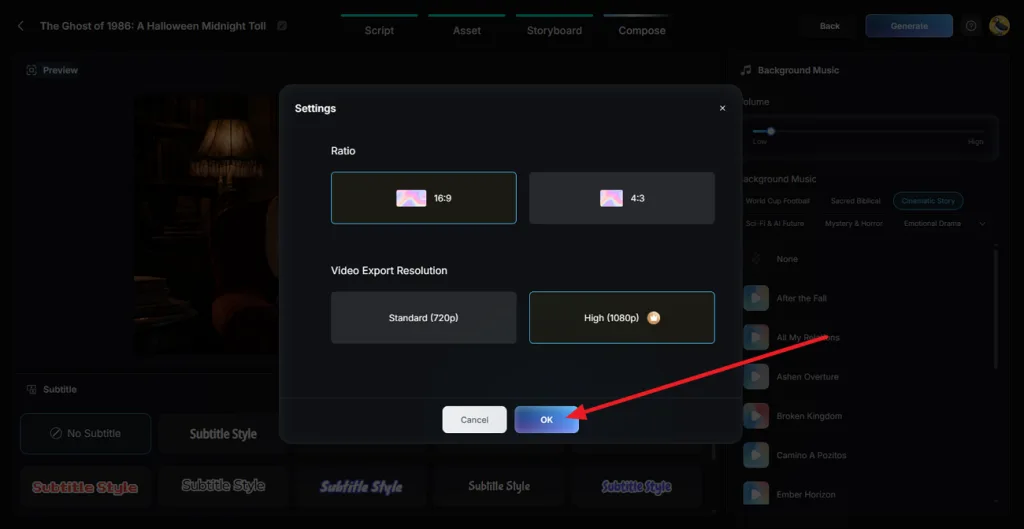
Choose the final Ratio and Video Export Resolution in the export settings. Select 16:9 for a widescreen frame and High (1080p) if your plan supports it, then click OK to render the video.
Step 8. Preview and Download the Video
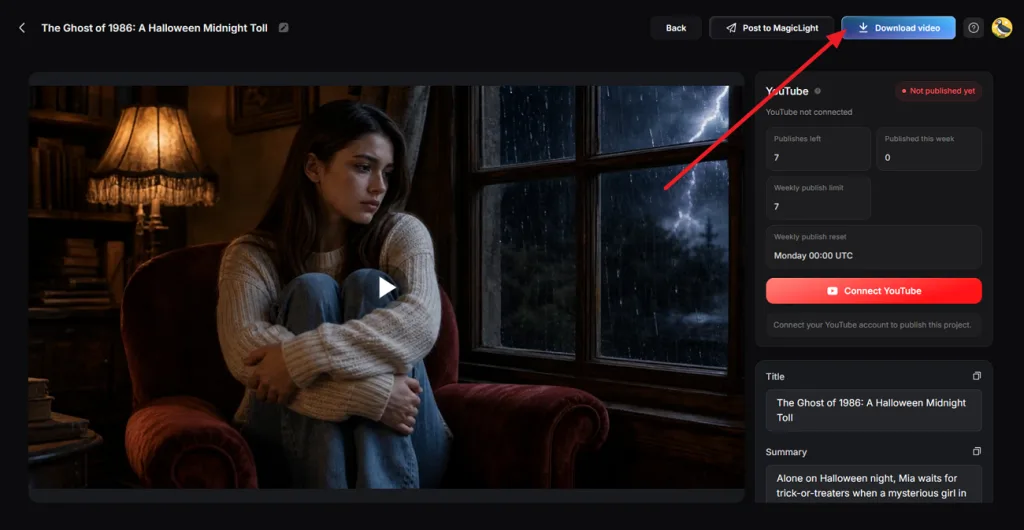
Watch the completed film in Preview and check the visuals, narration, music, and pacing. Adjust the suggested Title if needed, then click Download video to save the finished film or Post to MagicLight to share it.
Part 3. Tips for Making Videos Look More Cinematic
Small technical mistakes can quickly weaken an otherwise polished cinematic shot. The tips below explain how to make cinematic videos look more professional, starting with 4 on-set adjustments and ending with two editing techniques:
- Add an ND Filter Outdoors: Bright daylight at 1/50 of a second can cause overexposure, while an ND filter reduces incoming light without changing the shutter speed.
- Shoot in a Log Profile: Log profiles such as S-Log3 or C-Log capture a wider dynamic range, preserving more highlight and shadow detail for grading when properly exposed.
- Move the Camera Slowly: Push in on the keeper across roughly one meter over 10 seconds, and keep sudden pans for the storm scene.
- Light Faces From One Side: Place one lamp about 45 degrees to the keeper’s left to create natural facial shadows and stronger contrast than evenly distributed ceiling lighting.
- Cut on Motion: Changing shots in the middle of the keeper’s turn toward the window hides the edit inside the movement.
- Leave Quiet Seconds: The 2 or 3 seconds without narration after the lamp goes dark give the wind and the score room to carry the scene.
Conclusion
A cinematic look comes from deliberate choices in frame rate, lighting, composition, pacing, and color. Learning how to create cinematic video means bringing those elements together consistently, whether you shoot on a phone and grade in DaVinci Resolve or work entirely with AI. For a faster route without filming, MagicLight AI can turn a story idea into a complete cinematic video with planned scenes, narration, music, and animated visuals.
FAQs About Creating Cinematic Videos
1. How do I make a regular video look cinematic?
Switch the camera to 24 fps and frame the subject off-center, facing open space. A slow, gimbal-mounted push-in replaces the shake of handheld footage. In editing, cooler shadows and 2.39:1 letterbox bars give ordinary footage the widescreen feel of a feature film.
2. How can I make cinematic videos with my computer?
DaVinci Resolve is a free video editing tool for Windows and Mac, offering advanced color correction and grading features for cinematic videos. If you prefer creating videos without filming, MagicLight AI turns written stories into cinematic scenes directly through your browser.
3. What camera settings are best for cinematic videos?
Start at 24 fps with a 1/50 shutter, close to the film standard of 1/48. Start with the camera’s base ISO and adjust the aperture according to your lighting and desired depth of field. Setting a fixed white balance suited to the lighting conditions helps maintain consistent colors between shots.
4. Can AI generate cinematic videos from text prompts?
Yes, and MagicLight AI is the recommended starting point, since its Agent drafts a full script and shot list from one line of text. Frames then render in a style such as Realistic, and the Cinematic Story filter adds a matching score.