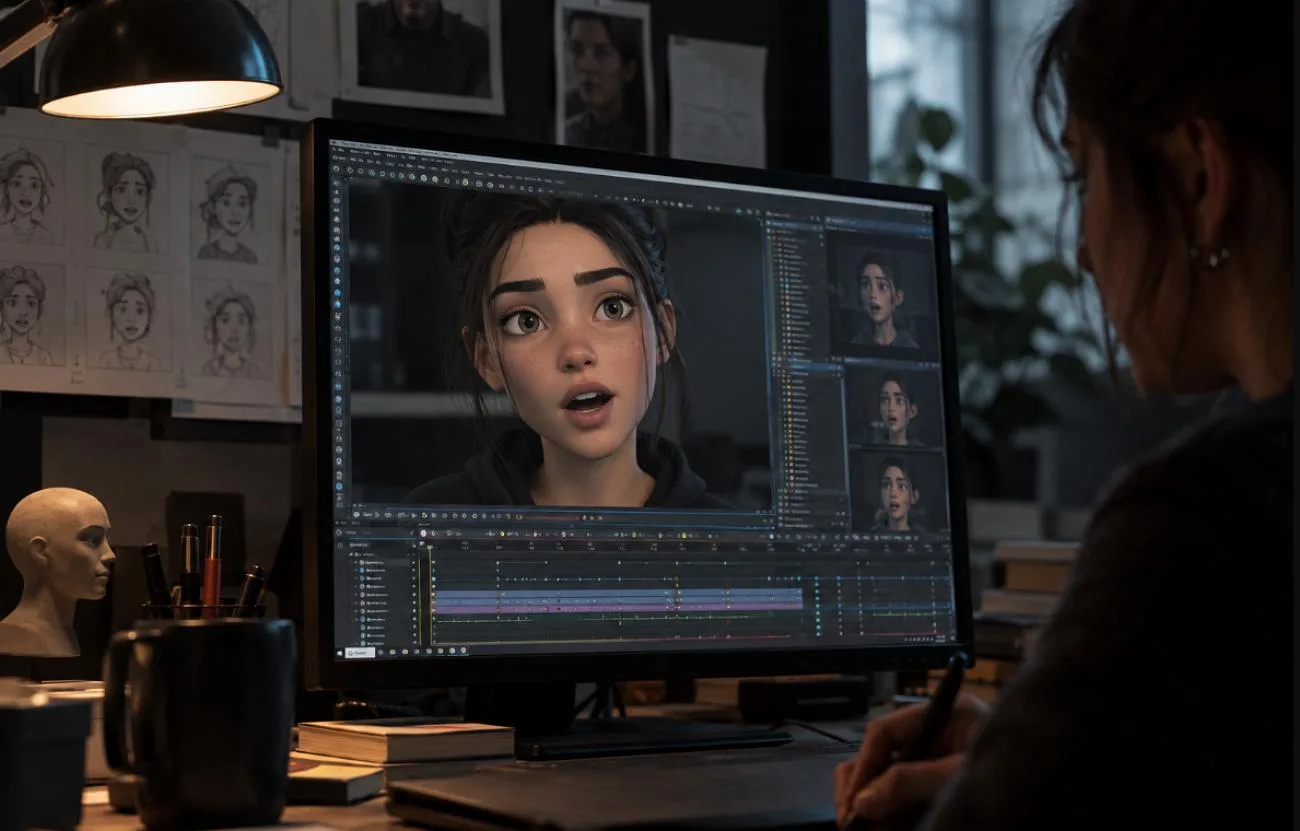
Good lip sync depends on timing. The mouth must change shape at the right points in the dialogue, while the eyes, brows, and rest of the face support the performance. Learning how to lip sync animation therefore involves studying the audio first and building the facial movement around it. AI offers another route by creating these movements directly from a voice recording.
Part 1. What Is Lip Sync Animation?
Lip sync animation pairs recorded speech with a character’s mouth movement. The process involves identifying key speech sounds, assigning suitable mouth shapes, and placing each change at the right point in the audio. The exact movement varies with the character, dialogue, and animation style.
How Lip Sync Works
In many Western animation productions, voices are recorded before animation begins. Animators break the recording into individual speech sounds and mark their timing frame by frame on an exposure sheet. This breakdown is central to how to animate lip sync, because it shows when each mouth shape should appear.
Each sound is then matched to a visible mouth shape used to represent one or more speech sounds. Several sounds can share the same viseme. Rhubarb Lip Sync uses 9 mouth shapes based on the Hanna-Barbera approach commonly used for 2D animation:
| Mouth Shape | What It Looks Like | Sounds It Covers |
| Closed | Lips pressed together | M, B, P |
| Clenched | Slightly open, teeth together | Most consonants, such as K, S, and T, plus EE |
| Open | Jaw partly dropped | E in “men,” A in “bat” |
| Wide Open | Jaw fully dropped | A in “father” |
| Rounded | Lips softly rounded | O in “off,” ER in “bird” |
| Puckered | Lips pushed forward | OO in “you,” OW in “show,” W |
| Lip Bite | Upper teeth on the lower lip | F, V |
| Tongue Up | Tongue behind the upper teeth | Long L sounds |
Scratch, the free block-based coding platform, uses the same basic principle on a smaller scale. For Scratch lip sync, creators can draw different mouths as sprite costumes and switch between them with “switch costume to” and “wait” blocks timed to the audio. Some projects use the Loudness block instead, opening the mouth when microphone input rises above a chosen level.
Key Elements of Good Lip Sync
Accurate mouth shapes are only the starting point of believable dialogue. Timing, rhythm, and facial expression determine whether the character appears to be speaking naturally. These 5 techniques help make lip sync more convincing:
- Anticipate Each Mouth Shape: Place important mouth shapes slightly before the corresponding sound when needed. If a shape appears only after the sound begins, the lip sync can feel late.
- Emphasize Clear Lip Sounds: Close the lips fully for M, B, and P, and bring the upper teeth toward the lower lip for F and V. These sounds have distinctive mouth positions, so incorrect shapes are easier to notice.
- Match Jaw Movement to Speech: Open the jaw more on stressed syllables and relax it between phrases. This creates a natural rhythm instead of giving every sound the same amount of movement.
- Prioritize Important Mouth Shapes: Hold clear, readable shapes and simplify very short transitions between them. Trying to animate every phoneme separately can make the mouth move too quickly and look unnatural.
- Coordinate the Whole Face: Match mouth movement with the eyes, eyebrows, cheeks, and head. Small variations and slightly asymmetrical expressions can also keep the character from looking stiff or mechanical.
Common Animation Styles
The approach to lip sync for animation changes with the animation style and production workflow. Artists may draw individual mouth positions, switch between prepared shapes, control a facial rig, replace physical parts, or generate movement from audio. The table below compares 6 common animation styles, how each creates mouth movement, and the tools or examples associated with each approach:
| Style | How the Mouth Moves | Tools or Examples |
| 2D Hand-Drawn | Each mouth is drawn per frame from a chart | Paper and pencil, Toon Boom Harmony |
| 2D Cutout | A rig swaps pre-drawn mouth shape | Moho, Adobe Character Animator |
| 3D | Blend shapes and a jaw bone reshape the face | Blender, Maya |
| Stop-Motion | Replacement mouths or faces change each frame | Laika’s 3D-printed faces |
| Anime | Simple mouth flaps, often voiced afterward | TV anime series |
| AI-Generated | Mouth motion is predicted from the audio | AI video generators |
Why Lip Sync Matters
The McGurk effect shows how strongly viewers connect visible mouth movements with sound. ITU-R BT.1359 reports detection thresholds around 45 milliseconds for sound leading picture and 125 milliseconds for delayed sound, making precise animation lip sync important.
Lip sync also supports localization. Changing languages alters dialogue timing, so mouth movements created for the original recording may need adjustment to match the translated speech.
Part 2. How to Create Lip Sync Animation With AI
Learning how to lip sync animation with AI starts with the dialogue. MagicLight AI handles this through MagicLight Agent, which develops a one-line idea into dialogue-driven scenes. It then creates a storyboard and production plan with quality and budget checkpoints. After approval, the Agent establishes the characters’ appearance and voices before moving the project into Story to Video.
Story to Video can turn a prompt or story idea of up to 12,000 characters into a finished animation that can last as long as 50 minutes. MagicLight AI automatically generates lip sync for each speaking character and supports 11 languages, removing the need to create and time individual mouth shapes manually.
Key Features of MagicLight AI
- Story Model Selection: Choose from 14 story models, including GPT-6 Astra and Claude Opus 4.6, to refine scripts for different stories and video formats.
- Voice and Character Customization: Choose from 37 AI voices, adjust age, gender, and accent, or create a cloned voice for a character.
- Visual Style Library: Select from 52 visual styles to define the appearance of characters, environments, and the overall look of each animation.
- Subtitle Customization: Choose from 16 subtitle styles to control how dialogue and captions appear throughout the finished animated video.
- Background Music Library: Select from 40 background music options to complement the mood, pacing, and atmosphere of different scenes.
- Image-to-Video Creation: Image to Video accepts prompts up to 1,500 characters and creates animated clips lasting up to 30 seconds.
Guide to Creating Lip Sync Animation With MagicLight AI
In MagicLight AI, how to lip sync animation follows an 8-step workflow that moves from the initial story idea to the finished video. The steps below show how to develop the script, set up characters and voices, refine expressions, generate the animation, and export the final result:
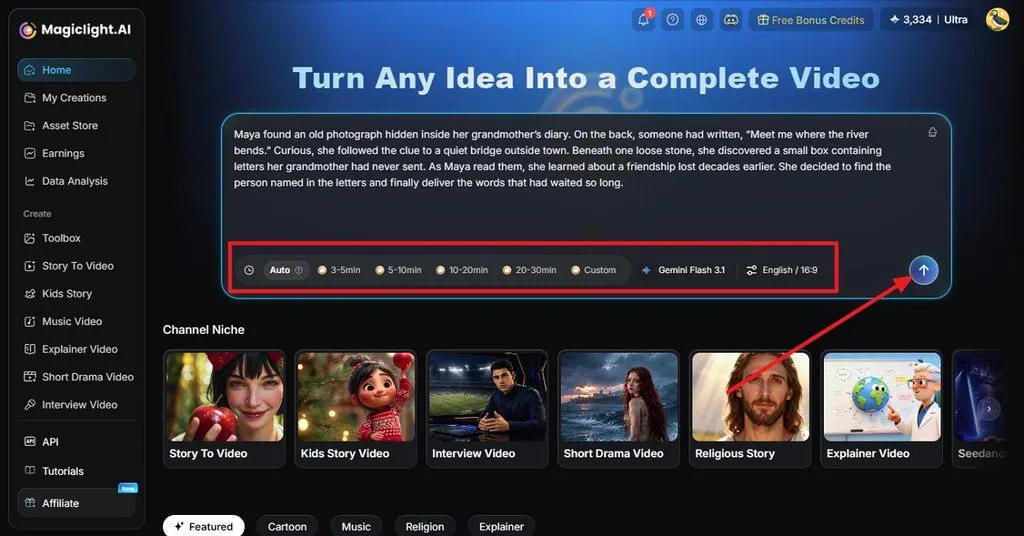
Step 1. Add Your Story and Video Settings
Enter your story idea or script in the Story to Video prompt box. Set the preferred video length, story model, language, and aspect ratio using the highlighted options below the prompt. Once everything is set, click the arrow on the right to send your input to MagicLight Agent.
Step 2. Review and Confirm the Script
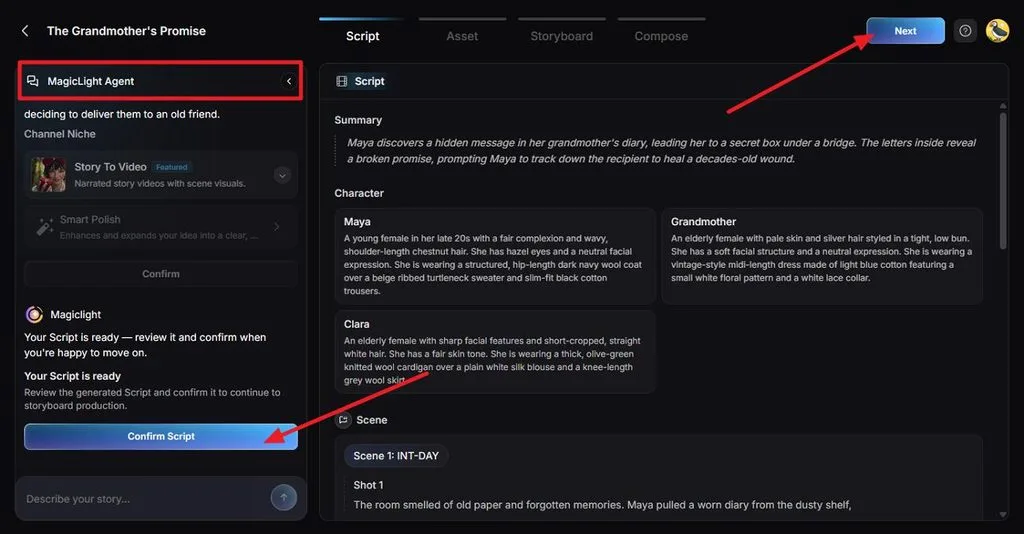
MagicLight Agent organizes your idea into a script with a summary, character descriptions, scenes, and individual shots. Read through the generated content and make sure the dialogue and story structure work as intended. Click Confirm Script, then select Next to move to the production settings.
Step 3. Set the Visual Style and Motion
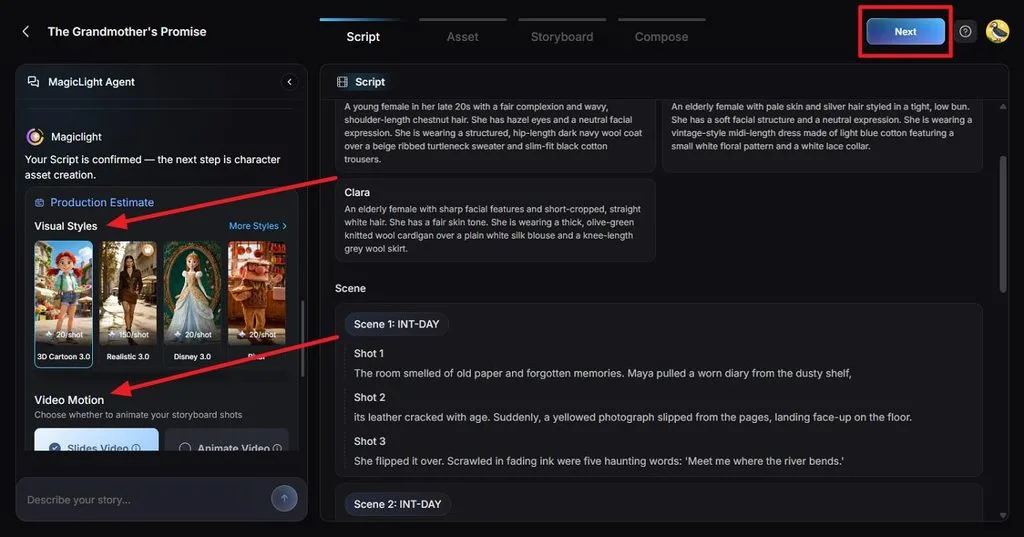
Use the Production Estimate panel to define how the animation will look and move. Choose a Visual Style that fits the story, then select the preferred Video Motion option for the storyboard shots. Review the estimated production setup and click Next to generate the character assets.
Step 4. Review the Character Assets
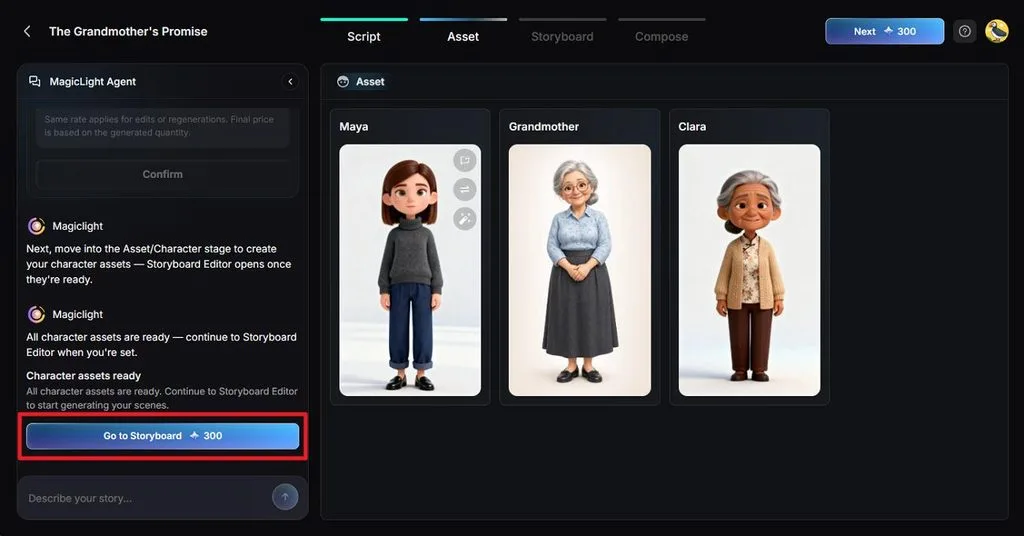
MagicLight AI generates character assets based on the descriptions in the approved script. Check each character’s appearance to make sure the cast fits the story and remains visually consistent. When all character assets are ready, click Go to Storyboard to begin building the individual scenes.
Step 5. Refine and Animate the Storyboard
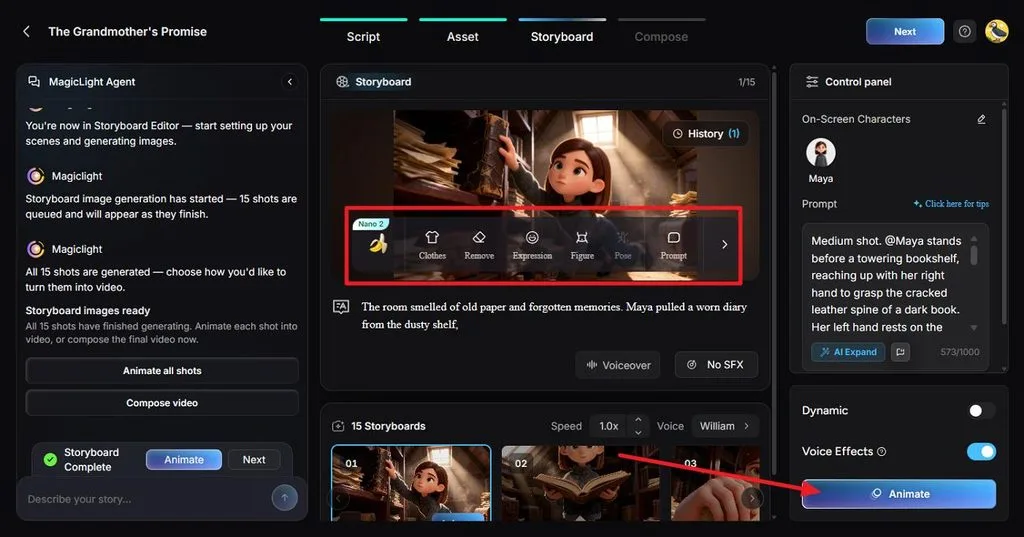
Review each generated shot in the Storyboard editor before turning it into video. Edit the Clothes, Remove, Expression, Figure, Pose, and Prompt controls to refine the scene and character performance. Once a shot looks right, click Animate to generate its animated version with voiceover.
Step 6. Add Subtitles and Background Music
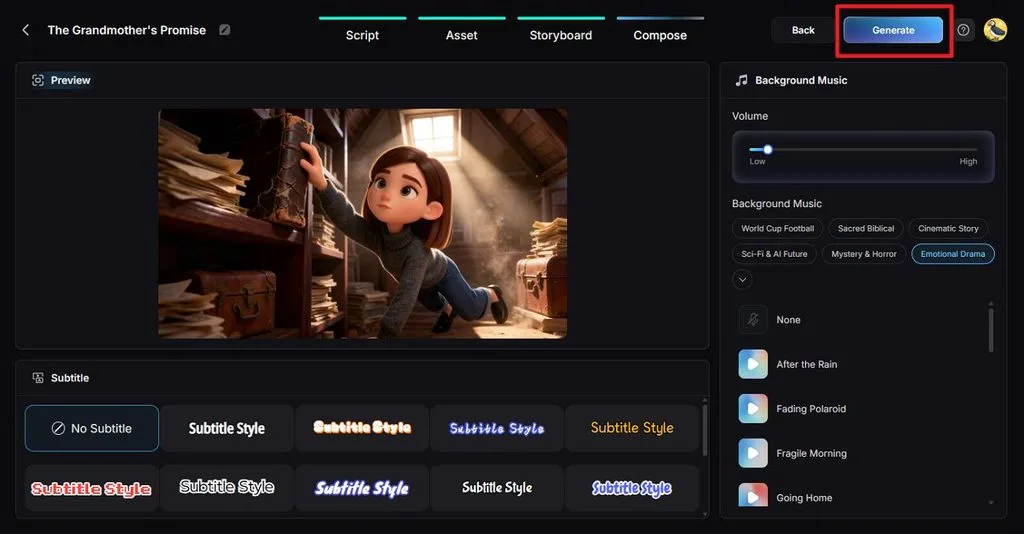
Move to Compose to prepare the finished video. Preview the animation, choose a subtitle style, select suitable background music, and adjust its volume from the panel on the right. When the audio and presentation are set, click Generate to proceed to the final output settings.
Step 7. Choose the Export Settings
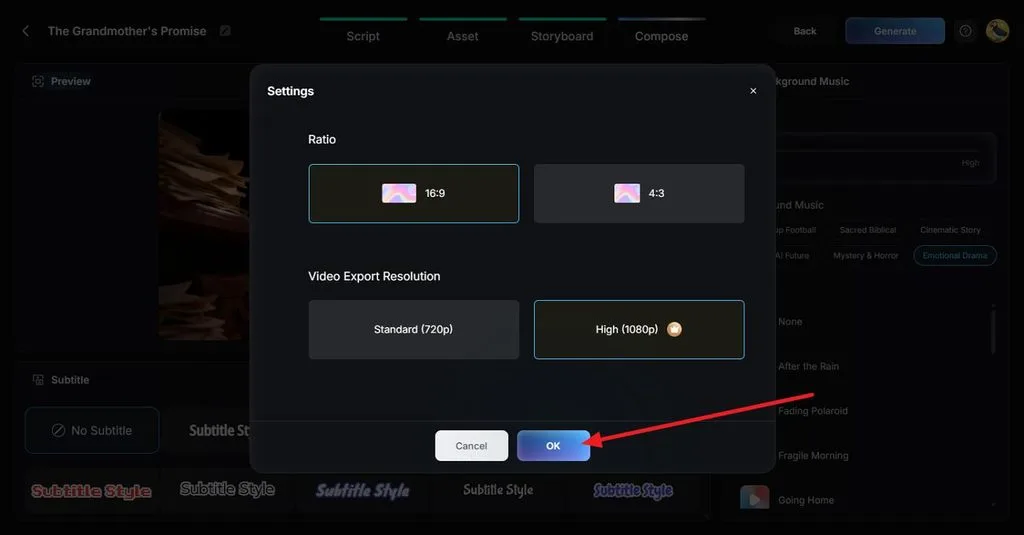
Select the final format in the Settings window. Choose 16:9 or 4:3 for the aspect ratio, then select Standard (720p) or High (1080p) for the export resolution. Click OK to confirm your choices and let MagicLight AI generate the finished video.
Step 8. Preview and Download the Video
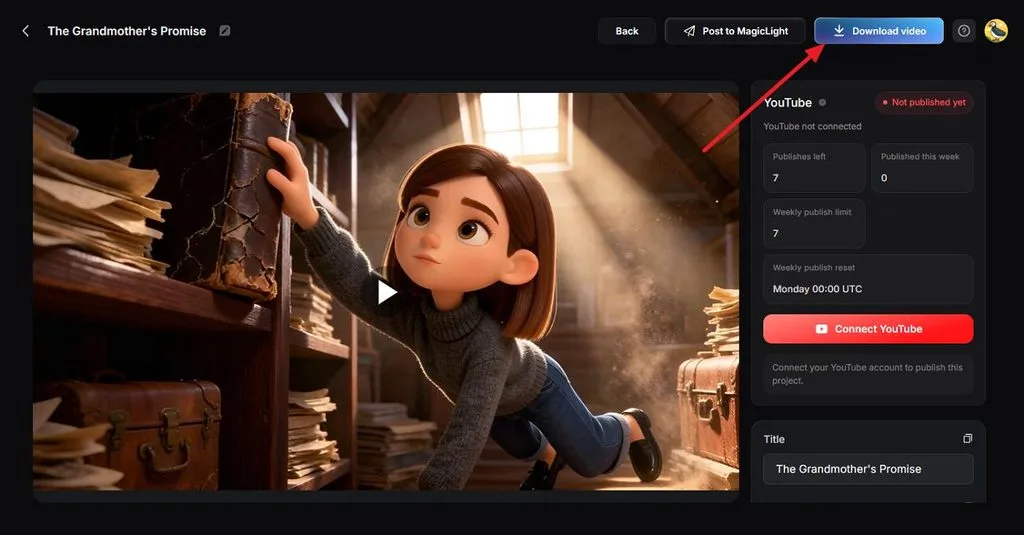
Play the completed animation to check the visuals, dialogue, and automatic lip sync before exporting it. If the result is ready to use, click Download Video at the top of the page to save the finished animation to your device.
Conclusion
Learning how to lip sync animation comes down to matching mouth shapes with accurate timing and expressive character movement. Traditional workflows require careful frame-by-frame work, while AI can automate much of the process. For creators who want to move from dialogue to finished animation faster, MagicLight AI is a practical option for creating lip sync clips.
Frequently Asked Questions
1. How do animators lip sync?
Animators record the dialogue, mark each sound on an exposure sheet, and pose a key mouth shape for every sound worth showing. The polish passes in a typical animator’s guide then adds jaw movement, expression, and head accents.
2. Is lip syncing hard in animation?
Lip syncing animation by hand is demanding at first, because each line needs a sound breakdown, timed shapes, and an expression pass. Adobe Character Animator, Toon Boom Harmony, and AI video tools now automate much of the first pass.
3. How do I make lip sync look more natural?
Much of what makes “animation lipsync” look natural is restraint, using fewer and stronger shapes instead of one per letter. A mirror or a phone recording of the line shows how the jaw, cheeks, and eyes move together.